GROUND ANCHORED SOLUTION FOR A SAGGING BOARDWALK

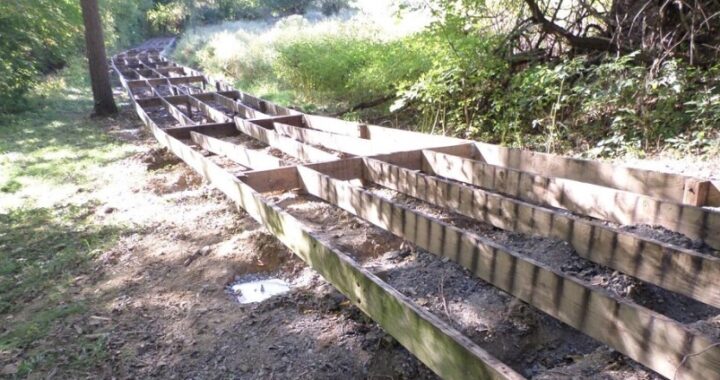
Titan Deck Foot Anchors streamlined the repair of a 400-foot-long Pennsylvania boardwalk.

Chambersburg, Pennsylvania, contractor R. A. Hill Inc. won the bid, but now company vice president Jim Hill had a challenge on his hands: a deteriorating boardwalk running through a low-lying wet area along a south-central Pennsylvania stream.
 
In the bid documents were a set of plans with an unfamiliar structural detail. New crossbeams had been specced to reinforce the existing boardwalk framing, but instead of being supported by PT posts bearing on concrete footings (the boardwalk’s existing foundation system), the beams would bear on metal anchors manufactured by a Canadian company called Titan Building Products.
 
After a little online research and a few phone conversations with company founder and president Richard Bergman, Hill felt enough confidence in the system to place an initial order for 100 Titan Deck Foot anchors for the project.
There are actually three parts to each anchor: a galvanized steel post bracket, a cap plate, and an auger that is screwed through the cap plate into the ground.
 
The auger looks a little like a helical pile, but its main job is to resist uplift rather than provide bearing strength. That job is done by the cap plate, which the company says can resist loads of more than 19,000 pounds per square foot (an Intertek report is available here).
 
The beauty of the system – especially on this project – is that the auger can be installed with a hand-held impact driver, eliminating the need for heavy equipment.
The company makes both 24-inch-long and 36-inch-long augers, and says that the 24-inch-long auger is fine for most soil conditions. Hill decided to use the 36-inch-long version to provide better pull-out resistance in the soft soils along the stream.
 
Titan says that auger length doesn’t really affect the footing’s resistance to frost movement, and Hill expects that this boardwalk will rise and fall seasonally. But to prevent damage to post-beam connections, the anchors are engineered with what the company calls “Terra-Shift” technology.
 
These are basically slots instead of round holes in the brackets that allow the post to slide up and down rather than being locked in place by the fasteners when frost exerts a force on the deck.

Boardwalks Are Free Standing Structures

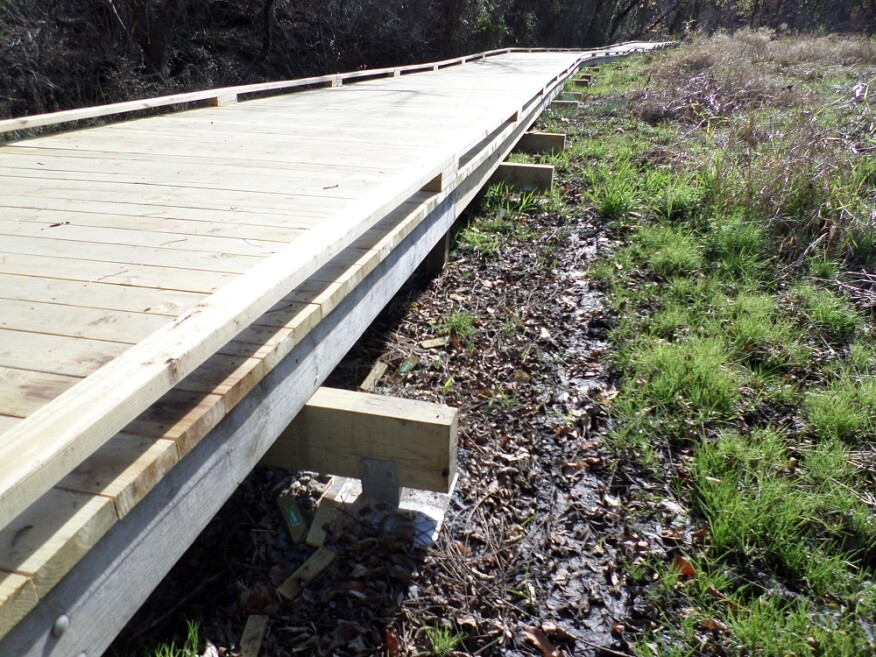
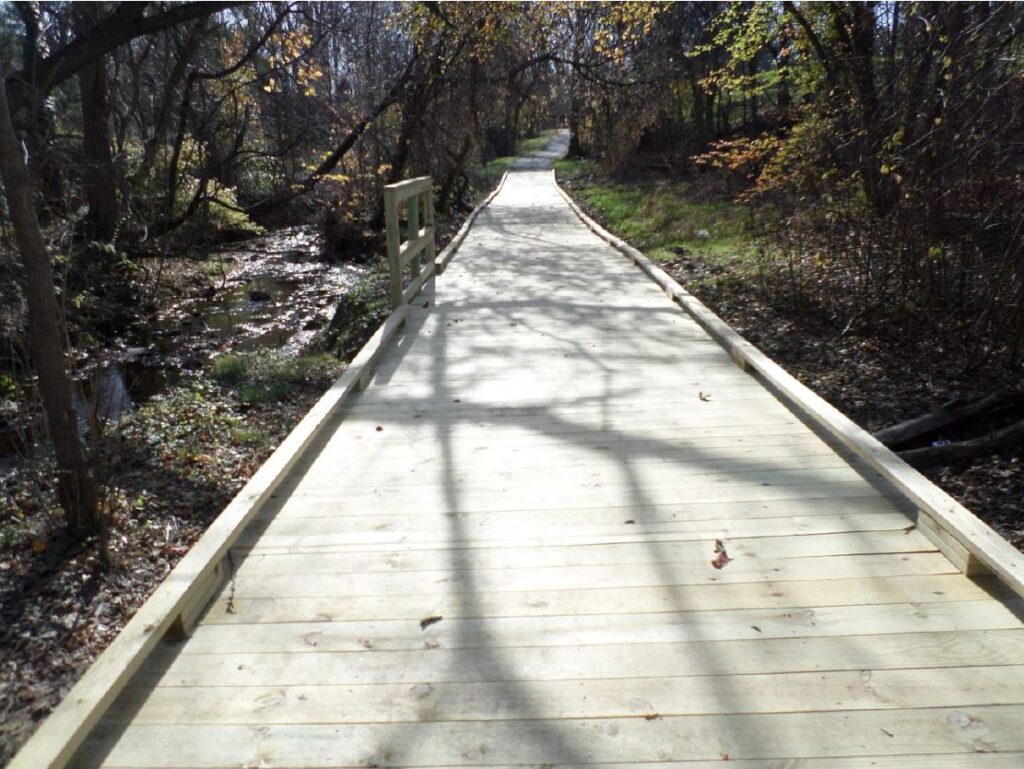
Hill says that his company ended up removing most of the old 2×6 PT boardwalk decking and replacing it, due to the amount of rot damage they found in the old 2×6 PT stock.

Where they could, they retained the 2×8 PT framing, which was in better shape than the decking; only seven joists needed to be replaced.

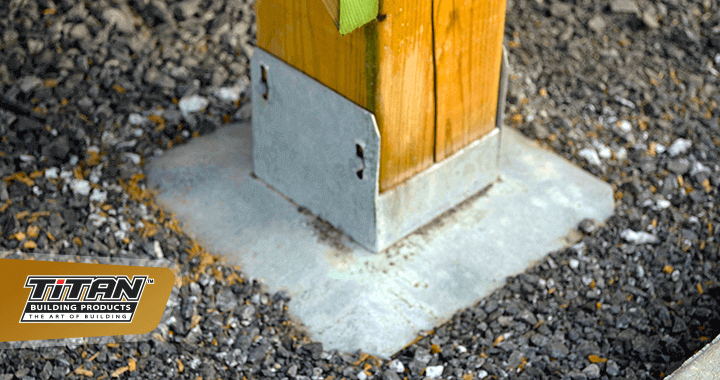
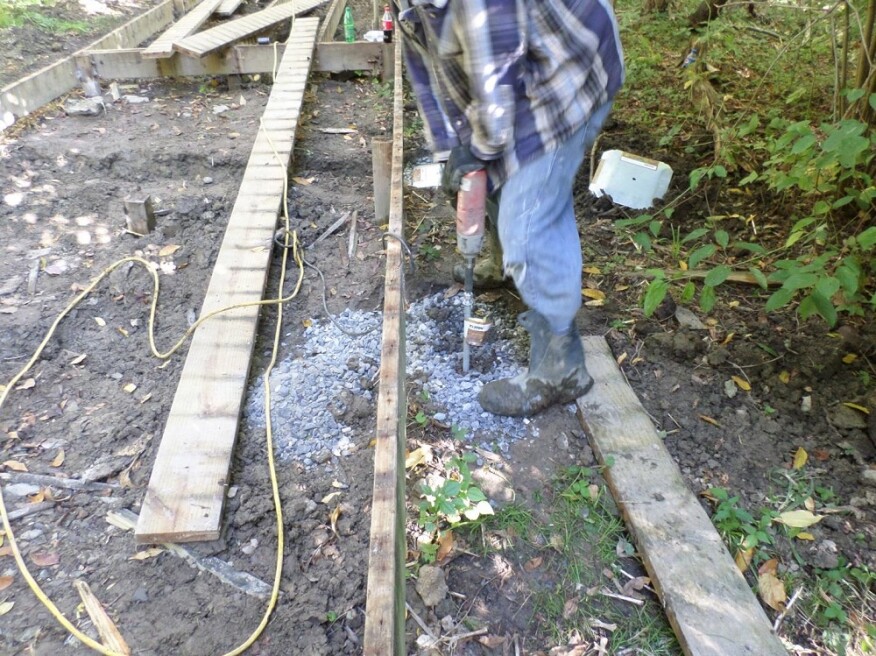
To reinforce the structure and minimize sagging, the crew installed 49 pairs of anchors along the length of the boardwalk. Located on either side of the boardwalk framing midspan between existing posts, the anchor pairs were tied together with 4×8 PT crossbeams, which support the joists.

In most locations, the crossbeams bear directly on the anchors, but where the ground dips away from the framing, 4×4 posts were used between the anchors and crossbeams.

Hill says that his crew unexpectedly discovered a number of existing PT posts that had deteriorated beyond repair.

Rather than replacing them with more PT posts, he placed a second order for another 53 anchors.

His reasoning? It would be a lot easier to transport relatively light steel hardware along the length of the boardwalk to make repairs instead of PT posts and heavy bags of concrete.

Another plus: Hill reports that it only took from 15 minutes to a ½-hour to install each anchor, which helped keep project costs under control.

The process involves minimal excavation, mainly to prep and level the area where the anchor is installed and put down a 2-inch to 3-inch layer of 1/2-inch crushed stone.

Because much of the boardwalk was close to grade, it was necessary to excavate a little deeper in some areas to fit the crossbeams and anchors underneath the existing framing. Cost for the Deck Foot anchor is about $54 each.

FINEHOMEBUILDING ARTICLE ON THE TITAN DECK FOOT ANCHOR

One question people often ask is whether residential building codes always require deck footings be below frost. And the answer is they don't.

That’s right the IRC doesn’t always require deck or shed footings to be below frost depth. It does require this when a deck is attached to a house, but if you’re building a shed or a freestanding deck, you don’t need frost footings.


Andy Engel, the editor of FineHomebuilding magazine wrote an article on this very point. He specifically wrote about the Titan Deck Foot Anchor. So if you are considering using it for one of your upcoming projects, be sure to read this article.

I often mention this to folks but when someone like Andy Engel from the leading builder’s magazine in the country says the same thing you can have some confidence with that.

Non-Ledger Attached Decks

Connecting to the ledger is fairly easy during new construction. But it can be a very challenging task once a home is built and has to be done right.
 
So it’s good to know that free standing decks are permissible and do not require frost footings.
 
Check out the Finehomebuilding article on the Deck Foot Anchor.

AN ABOVE GROUND POOL DECK THAT IS ROCK SOLID

A free standing deck with footings more secure and better looking than blocks but a fraction of the cost of poured concrete.

Some decks just don’t have to be built on traditional concrete footings. These are called floating decks because they are free standing and not attached to any thing else.  They move with the surface of the soil if it expands from frost in the winter and descend when it thaws.

Not every deck can or should be free standing. Sometimes you absolutely need a structure that is as immobile as the house it is attached to.  But for most residential decks, including pool decks like this, attaching to the house is not needed or recommended.

Ledger connections require breaking the waterproof envelope of the house so it has to be flashed, sealed and connected properly or you will have major problems.
white-pool-deck

The Least Expensive Option Is Not Always An Option

Of course concrete blocks are the least expensive way to do this and they have earned a spot in the market place.  But while they are only about $7-$8 each, they are not a silver bullet. The structure is only held in place by its own weight.  Many areas subject to high winds prohibit surface resting footings unless the entire deck is strapped with cables and spiked into the ground.

Or Spare No Expense And Effort - Poured Concrete Footings?

Brian White found himself looking at this very question.  How should he build his above ground pool deck? Should he use low cost blocks or high cost high labor poured footings?

His research led him to a perfect compromise. The Deck Foot Anchor was his choice. He wanted something much more secure and better looking than blocks but he did not want to pay the expense and labor of digging and mixing concrete.

Nor did he have to.  The pool deck was five feet high and with bracing became a rigid rock solid structure. He prepared the surface by removing the sod and built a small stone retaining curb.  He put down ½” crushed stone about 3″ deep and compacted it and made it level.
white-pool-deck-footing
The footings were set apart at 6’ maximum. He used an electric impact wrench and had all six footings down and perfectly level in about 45 minutes.

Ready For The Ride

This deck is securely anchored to the ground and in the winter when the soil freezes and expands, the footings will remain secured to the top surface but still anchored.  The entire deck will rise about ½” and then settle back down when the thaw comes.

Any free standing floating deck should be set away from the house or the pool in this case by about 1” to allow for that annual movement.

Brian was proud to show off his handy work to us and we were happy to see another homeowner build a successful project easier and for less money than some of the other options available. If you are building a deck or a shed and it does not have to be attached to your home, but you want it securely anchored to the ground, check out the Deck Foot anchor and see if it makes sense for your project.
case-study-stevens-address-posts

MASSIVE 500 POUND GRANITE ADDRESS SIGN BETWEEN FIR POSTS

Posts anchored on bedrock support a granite slab for an address sign

Builder Tom Stevens just finished building a striking chalet over looking a lake in the Laurentian ski country of Mont Tremblant.  He just needed a similarly impressive way to display the address of this beautiful home. 

But everything is rock in this area.

Tom is the kind of builder that can’t stand looking at large bulky connectors.  And yet there didn’t seem to be any easy way to anchor these large timbers to the bedrock. So using the common box store post anchors was not an option.

All the ideas he had were difficult, or expensive or both.

None of the available solutions were up for the job

When Tom saw that the 6×6 Titan Post Anchor could be a simple solution for the problem he faced he decided to use it.

Using a wedge bolt system he was able to anchor two timbers to the bedrock.  A half lap joint and bolts connected the cross bar. This massive 500 lbs granite slab was then hung between the posts.

Rumor has it that the slab weighs much more than 500 lbs

We are always amazed at the creativity of our Titan fans. This was a very impressive project and the posts look like they are growing out of the bedrock.
case-study-campbell-florida-roof-top

75 YEARS YOUNG AND DOING FINE, THANK YOU!

Apparently age is no problem for this roof top deck builder and his wife

John Campbell and his wife were 76 and 71 when they took on this project.They live in Dade County Florida and had to rebuild their roof top deck overlooking the inland canals and waterways you are probably familiar with. John did not want to have to bolt the railing posts to the fascia of the roof line.

So that lead him to an extensive search for a surface mounted wood post anchor that was neither to big and bulky nor too small and week – and that had some residential engineering testing behind it.

Helping people of all ages and skill levels succeed on their own. He wanted to be sure that if he installed it as directed, it was going to please the local inspector. We were glad he found us and it turns out the feeling was mutual.

“We’re not carpenters by any means, but my wife and I did this project entirely by ourselves.  I’m 76 and she’s 71 and it feels good to complete a project while adding value to our retirement home at the same time.  Anyway, I’m glad I found your product.” – John Richard Campbell

John and his wife did the job over a few days of work.   You can too!
case-study-macek-pergola

SAVING A FLOUNDERING PERGOLA ON STONE COLUMNS PROJECT

Pergola Built on Stone Columns Abandoned by Builder & Saved by Macek Custom Builders & 6×6 Titan Post Anchor
 
Rick Macek of Macek Custom Builders from Holland, Ohio inherited a mess from a previous builder.  The plans called for a rough sawn 6×6 cedar post pergola set on top of 30” stone columns.
 
A beautiful idea and concept but no one, not the architect nor the builder had thought through the details of how these large 6×6 posts were going to be inconspicuously and firmly connected to the stone columns.

Previous Builder Left Job Not Sure How To Finish It

The first builder got the stone columns finished but put a half effort into the cap stones and left ½” threaded rods protruding from the columns and off center.

The home owner was not pleased and was left in a lurch as the first builder left the project and Rick Macek was tasked with picking up the pieces.

He started by removing the cap stone and the rod which were not level nor centered.  He then started thinking of how he could easily connect the wood posts to the columns.

Such A Simple Fix To This Problem

He wanted something that was fairly easy to install, was not going to cost a lot of money and had some predictable performance standards behind it.  That search lead him to Titan Building Products and the patented Titan Post Anchor.

The old cap stones were removed and the cavity was filled with cement.  When the concrete had cured the post anchors were set in place exactly where the posts would be.  The holes in the anchor were used as a template to pre-drill the four corner holes for the concrete screws.

Preparing Posts For The Stone Columns

The crew got to work and installed the anchors into these beautiful large rough sawn western red cedar posts. They were then screwed firmly onto the concrete in the stone columns.

The cap stones were designed to fit around each post.  Using a 6” driver bit the concrete screws were fastened permanently locking the posts and anchors in place.

What a difference!

This homeowner went from despair to elation.  Macek Custom Builders did a great job and left this project feeling proud.

The 6×6 Titan Post Anchor is now a reliable member of Rick’s trusted products.  Just another solution available at his fingertips to help him out at the right time.

Make the Titan Post Anchor part of your arsenal.
case-study-macek-pergola
case-study-bacchus

INVISIBLE RAILING CONNECTORS

A weekend warrior builds a beautiful deck with a high end appearance
 
You don’t have to be an expert contractor with ten or twenty years of experience and know every trick in the book to blow away your expectations of what is possible to build these days.
 
And with the Titan family of deck connectors and footings Ken Bacchus was proud to show us just exactly what he pulled off over the course of a couple weekends.
He used the Deck Foot Anchor for floating decks (not connected to the house or ledger), the Titan Post Anchor for his railing posts and the new Shadow Rail connectors for a virtually invisible rail to post connection

A Floating Deck Avoids Ledger Connection Hassles

Ken knew there was no way he was going to start chipping away courses of masonry, locate the band board, insert double layers of metal flashing into the mortar line, bolt this all perfectly and according to code – and be sure it was air tight.

This just wasn’t needed for a deck that was only 24” above the ground. But he also wanted a footing that could offer the strength, security and stability that a poured concrete footing could but without all the labor and cost.

The Deck Foot Anchor fit the bill and he used an electric impact wrench and drove down 9 footings in less than an hour.  He prepared the surface by removing sod, leveling it and laying down a good 3”-4” of ½” gravel.

Beautiful Composite Decking Picture Framed

Ken installed two courses of darker colored boards to create a picture frame around lighter infield decking. This is a great way to hide cross cut ends of composite boards.  He also used side mounted deck fasteners.  The look is fantastic.
 

A Fast, Easy And Long Lasting Post Connection Solution

And rather than setting the posts into the joists and then having to notch each deck board around each post individually, he used a surface mounted solution.
The Titan Post Anchor made that easy for him and with maximum 6’ post spacing was backed up by residential engineering reports for compliance.  Decorative post skirts really made the final look clean.  And even with snow in the winter time everything shines up like new in the spring with a light spray down.
 

Railing Connectors That Are Virtually Invisible

Ken was on a roll and wasn’t about to miss anything.  He used the new Shadow Rail connectors, the first hidden fastener rail connectors that are fitted to closely match the cross sectional shape of a 2×4. All the screws fit inside the connectors.  The screws are driven into the 2x4s and posts straight on – no toe nailing and they grip the wood.

There is no chance of them moving and causing misalignment problems when the connectors are slid and locked together.  When Ken stained the railing and the connectors they were almost impossible to detect.

Imagine, all of this done by a complete amateur and some intuitive building products to remove much of the skill and complications for a great looking and long lasting structure.
case-study-abe-fence

A 4′ PRIVACY FENCE ON A CONCRETE RETAINING WALL

A simple solution helps this homeowner build a 4’ fence on concrete without any obvious connections or ugly hardware
 
How do you reliably secure wood posts to concrete for a small fence and make it look like the posts are growing out of the concrete?
This is the challenge or problem Cindy Abe was facing and couldn’t think of an acceptable solution for her beautiful home.  She had a lot that sloped down from the street to here front yard and home.  The slope was steep enough that a retaining wall had been built near the top to help manage the slope and allow from some attractive landscaping.

All of the post anchors available were big bulky metal brackets that looked very unattractive.  This ruined the appearance of the posts and the fence.  Also they were cheaply coated with a thin layer of paint and were sure to show rust within the year.

Cheap and ugly is what they were.

A Post Anchor Solution Waiting To Be Found

Cindy’s searches lead her to the Titan Post Anchor and her problem was solved.
It was simple enough for her to install the post anchors to each post and use concrete screws to secure each anchor to the retaining wall.  The post anchor is a fraction of the size of the typical brackets on the market.
With most of the anchor actually inside the post and hidden, all that is visible is a low profile 5/8″ base which on this job would also be covered up by trim pieces.
 

Post Spacing For Fences Versus Railings

As the manufacturer we recommend 4’ posts not be spaced more than 6’ apart because the higher the post the greater the leverage and the greater the flex in each post.

While it is critical to follow our engineering building code guidelines for 36” and 42” guard rail applications, there is considerably more leeway for fence applications that are not actually functioning as a guard rail.

As you can see for this job the fence ran a long distance in front of the house with a height change at one end.  The height of the fence and the touch of green between the fence and the road side makes for a beautiful look.

The fence is just high enough to provide some privacy and the wood texture of the materials gives it a natural organic feel.  So a wood fence was possible to install here in this otherwise challenging location rather than a metal fence.

An Approach And Entrance Befitting The Style Of The Home

The fence bordered both sides of the entry with concrete steps leading down to the front door. The planter beds flanking each side of the walkway perfectly finish the approach to the home.
 

Fence Posts With Virtually No Hint Of How They Connect To The Foundation

The finished look was stunning.  This is a cedar privacy fence on concrete with a horizontal layout of the fence boards. The horizontal lines of the fencing boards compliment the one story rancher style home and the wide low sloping roof line of the home.
Cindy even had some fun with the last section of the fence by switching the boards with a wire mesh infill. This gave the last section of the fence an open airy feel.

Look what Cindy did.  You can too!
case study Kerr Deck Side

BASKET STYLE BALUSTERS AND RAILING

An old deck gets a face lift and new railing

Did you know that of the 33 million plus decks in the US and Canada that the average life expectancy is eleven years?  Yes, those are the figures.  Of course this varies considerably depending on what materials were used and how carefully any given deck was built.

Patrick Kerr found himself facing this reality.

His deck was located in a spectacular setting, extending off the main floor patio glass slider doors and bordered by lush greenery. The decking was showing its age.  Railing posts that had been set in and bolted to the joists were soaked and deteriorating.

Boards were cracking, or rot was beginning to show up here and there.  So Patrick opted for a fairly simple face lift.  He removed all the decking himself, inspected the joists and beams for their condition.

All was fine.  The framing and under structure was rock solid. He had no desire to rebuild the railings the same way as before – setting them into the joists – if he didn’t have to.
He was looking for a wood post anchoring solution that would allow him to avoid all the framing, blocking, bolting techniques required to properly build a wood railing that would meet minimum code standards.  He also did not want to cut notches in the decking to fit around each post.

What to do?

His searches lead him to the Titan wood post anchor, an internal surface mounted post anchor where most of the anchor is driven deep inside the post eliminating a lot of bulky unattractive steel on common post anchors.
 
But the post anchor also had engineering testing and guidelines behind it so Patrick was confident it would please the local residential inspector.
 
This meant a huge reduction in skill and labor compared to the “build in to the joist” method that he had just replaced because the posts had started to rot.  It also meant as long as the post spacing was kept at a maximum of 6’ apart, he could position the posts with a lot more freedom regardless of where joists were.
 
All he had to do was install a flat 2×6 or 2×8 blocking piece between joists wherever he wanted a post underneath the decking. He was able to easily position posts, secure them down and even carry the railing down a small four riser stair case.
 
Each railing section was pre-built using the Dekorators basket style black balusters. The sections were fitted snugly between each post. Patrick opted for toe –nailing the 2×4 top and bottom horizontal rails to each post instead of using and railing connectors.

Regardless, the results were beautiful.  And this was an easy job for him.
 
It can be this easy for you too.  If you are looking at a similar situation – rehabilitation job on your old deck – consider the Titan solutions.